Cynthia and Co.

Cynthia and Co.
"My Junk Inspired L I F E"

Saturday

Crafting Butterflies For a Cause

The Houston Holocaust Museum is working on a project to display 1.5 million butterflies


to represent the children who died in the Holocaust.


This project is based on a
 collection of poems and drawings created by children


kept at the Terezin Concentration Camp from 1942-1944.


The collection was published in a book titled 
 "I Never Saw Another Butterfly"
from Shocken Books


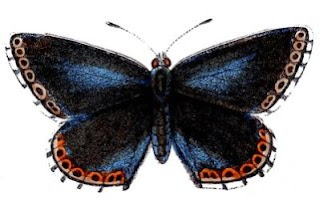
For some butterfly images, to inspire you, I have provided some I found on The Graphics Fairy.

When my project is complete I'll post a picture before I mail it to HMH.


If you participate and wish to share what you sent please notify me by email or leave a comment on this blog and I'll post your submission(s) in a new story.


For more information about the Houston Holocaust Museum go to


For free graphics from the Graphics Fairy go to


Thursday

Altered Art Book | Love for the Rose and Mother


My altered art book today is to celebrate mothers, angels, and roses.  My overall favorite themesMother's Day is almost upon us and what better way to thank the women in our lives than to pay homage to all things feminine (with a little grunge), kind and sweet.

cynthia and co. | altered art book

This book started out as a chipboard 3- ring binder.  I added papers, ribbons, flowers, pre-made frames and then painted and embellished the photographs

cynthia and co. | altered art book
 I loved the little girl in the above photograph so much that I used her in a couple different books.  She is sullen but not totally unhappy.  Perhaps I identify with her!


cynthia and co. | altered art book

 Above are more hand painted flowers.  No digital trickery this time.


cynthia and co. | altered art book

Love, Love, Love the paper. 

cynthia and co. | altered art book
 Sometimes when time doesn't allow, or I am feeling lazy I will break down and use precut images.  The above is grunged somewhat so it doesn't look like it did originally.  Hopefully.

cynthia and co. | altered art book
 Above I used feathers to mock the hat she is wearing.  To age them I painted with acrylic paint.

cynthia and co. | altered art book

The "story" I am telling is about a lady named Rose who loved to dress in hats and "rosy" clothes.  It takes Rose from cradle to grave.  All images are of different children and women - I took poetic license to make them appear to be the same person throughout time.

cynthia and co. | altered art book
As an older woman Rose still likes her hats! 
(Sometimes the urge to use a party hat overcomes me...I know they are overused but what can I say?)


cynthia and co. | altered art book
When Rose goes to Heaven she looks like her younger self...and now in Heaven she glows! 

cynthia and co. | altered art book
I don't think angels age.  Do they? 

cynthia and co. | altered art book

Another image I use a lot!  Crowns!
cynthia and co. | altered art book

Except for the photographs the embellishments for this book were originally new.  I did distress, paint, ink, tear, crinkle as much as possible to give the book a time worn look without totally scarring the  photos. Its sweet with a goofy madeup story...just a way for me to use the imagery of a rose.
In closing:

This is for my own Mother and to my Sisters..and
Happy Mother's Day to all the awesome Mothers, Sisters, Aunts, and Cousins out there...and if you were never a Mommy (like me) to all of those Puppy and Kitty Mommies, too.  May you  all have a relaxing and happy day.


Tuesday

Lampshade Redo With Recycled T Shirts

Today's project is to redo a lampshade with a recycled T shirt.  Taking one large shirt, a few pearl beads and a yard of salvaged grosgrain ribbon...


Starting off we'll use the T shirt sleeves to create the flowers.  There are two different sizes -  to start we'll do the large rosette.


Cut sixteen 1"x10" strips and stretch the fabric until it curls.  The large flower will use two strips of material per flower.  You'll need a white glue - I used a no sew glue from Walmart.


Secure the two strips at the top and braid (or twist) all the way to the end and then secure the bottom ends with glue.


Curl with strands into a floret, twisting the two as you curl.  Glue the finished rose to a scrap of T shirt fabric.  Repeat and do eight rosettes.  Once the glue has dried cut away excess backing.


For the smaller rosette we'll cut eight 1"x10" strips and pull tight so the fabric curls.


Wrap the curled strip around your index finger, leaving a hole for the pearl, and wrap the tail to the back of the coil.  Glue the coil to scrap T shirt fabric and allow to dry.  Repeat and do this eight times for eight completed small rosettes.


Once the glue has dried cut away excess fabric.  Add the pearls to the center.  Cut eight squares of grosgrain ribbon and glue flower assemblage to the grosgrain ribbon.  Set aside.


The lamp was a thrift store find that was cute enough as is, however, the shade was soiled with grease and smudge so I decided to use a recycled T shirt to give it a slightly altered, informal look.


Cut fabric off the shade's frame leaving original silk fabric around the top and bottom of the frame.


Cut one side of the T shirt and wrap around the bottom of the shade with the T shirt hem on the bottom portion of the shade.  Cut excess width of  fabric from the shirt (leaving extra for seam allowance) and sew fabric into a tube shape.  (The height of the fabric will be the height of the shade plus about eight inches.)


Top stitch over the sewn seam and press your T shirt tube to remove wrinkles.

Lay the shade on the T shirt tube to measure and cut strips (for ties) along the top of the tube.


In the example photo above you can see I cut strips just to the top of the shade.  When I actually started to tie the shirt fabric I found the cuts needed to be deeper so I cut approximately one inch past the top of the shade to make room for the tails to wrap around the top of the shade's frame.


Using your no sew fabric glue, affix the hem of the shirt tube along the bottom rim of the shade keeping the hem as straight as possible.  Press with your fingers and allow to dry.  The photo above is the shade being held upside down with the tails dangling prior to being tied.  Note:  when adding your tube to the shade think of the shade as a square and start gluing on one side, then glue the opposite side, then the third side, and fourth side so any excess fabric you may have can be eased around the circle.  (This is the same technique you would use if you were upholstering a seat cushion.  Make sense?)


When making your ties pull the fabric taught as possible and tie in the same direction -  always have tails to the left (or to the right depending on your technique).  Note:  if I make another shade using this method I will probably remove the original fabric along the top of the shade.  In the photo above you can see a little of the silk showing through the ties.  Also, when making ties you'll tie one side, rotate the shade and tie the opposite side, etc. and then tie in middle sections.  This helps you get your ties evenly scattered along the top of the shade.


The ribbon I used was a little more than double the shade's circumference.  Pleat the ribbon and glue (with either hot glue gun or your no sew fabric glue) to the inside of the shade along the T shirt hem.  Evenly gather and affix to the fabric.  


Add your large and small rosettes gluing them along the hem of the outside of the shade.


Voila!  You are done!

Monday

Free Blog Buttons | Copy and Paste

I've added some free blog buttons for anyone who wishes borrow them - just copy and paste!  They were a lot of fun to make and I'm hoping you might find one or two you can use for your own blogs.


There are more images on front page...go to home and click on Free Blog Buttons icon.


All are jpg files and less than 200 pixels wide so they should easily fit in your sidebar.  There is no link back so you can copy and paste to your computer and upload to your blog as you would upload any photograph.  I hope you enjoy!  I'll add more when I find some good images that "talk" to me!

Bye for now.  Cynthia